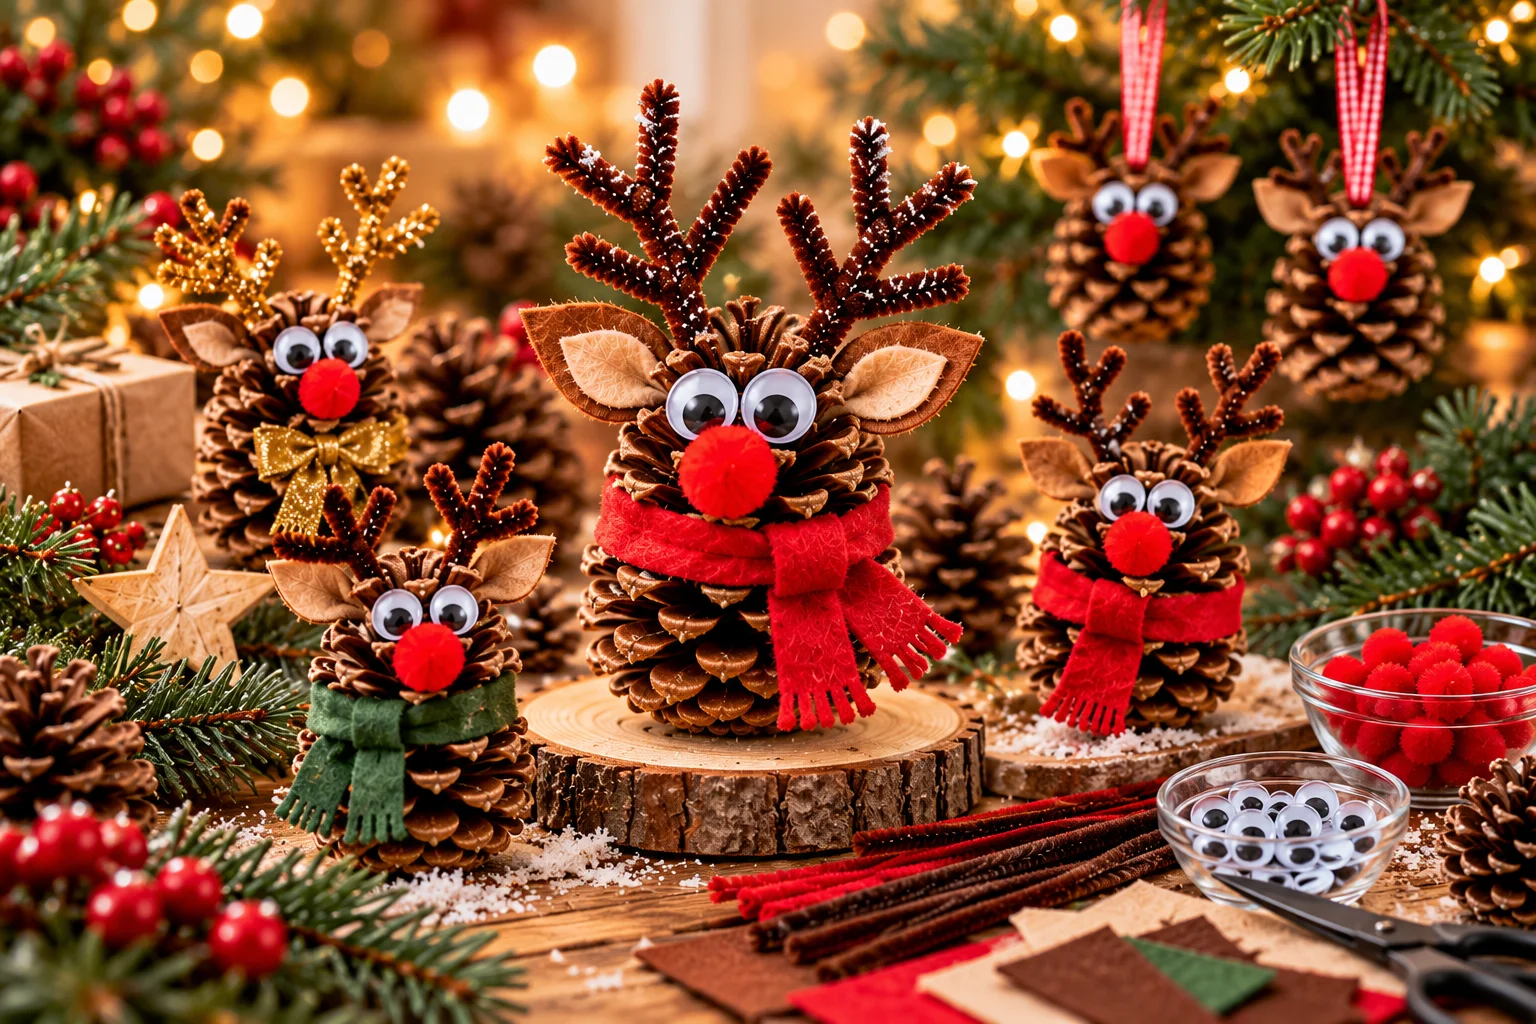
Looking for a simple Christmas craft that keeps little hands busy and brings a touch of woodland charm to your holiday decorations? An easy pinecone reindeer craft for kids is a wonderful way to turn natural materials into an adorable seasonal creation.
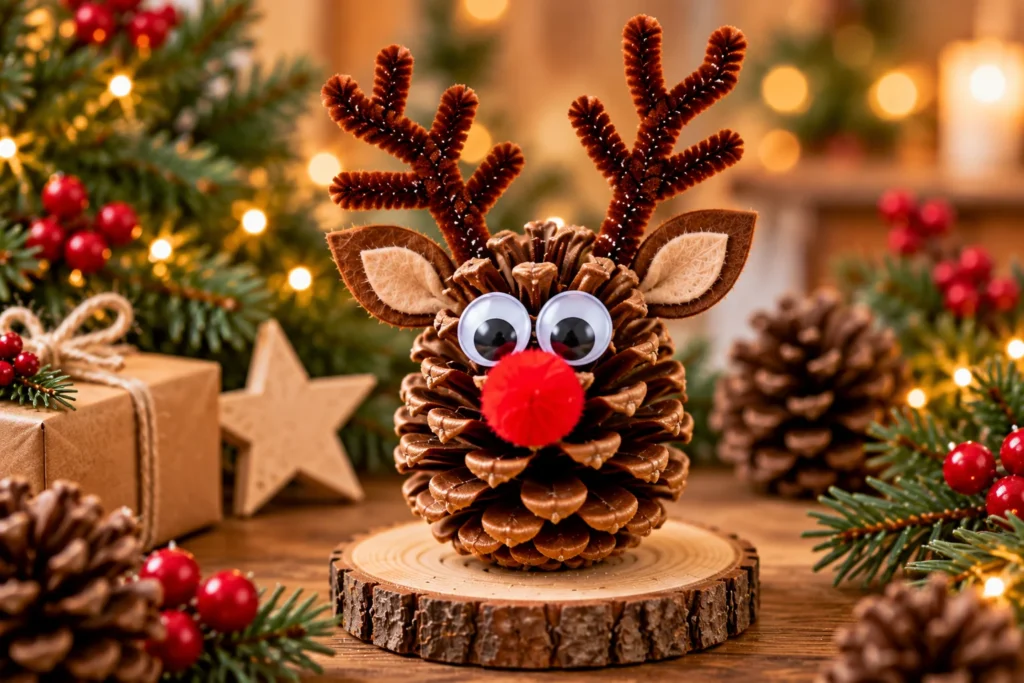
With a pinecone, googly eyes, a red pom-pom, and a few simple craft supplies, children can make their own little Rudolph to display on a mantel, decorate a holiday table, or give as a handmade gift. This project is affordable, easy to personalize, and suitable for a cozy afternoon of Christmas crafting at home.
Whether you’re planning a classroom activity, a family craft day, or a festive weekend project, these pinecone reindeer ideas offer plenty of opportunities for creativity.
Quick Takeaways
- Use clean, dry pinecones as the body of each reindeer.
- Add googly eyes, a red pom-pom nose, and pipe-cleaner antlers for a recognizable Rudolph design.
- Let children choose their own colors, expressions, and decorative details.
- Use child-safe materials and have an adult handle hot glue, sharp tools, and small parts.
- Display finished reindeer on shelves, holiday tables, or homemade Christmas scenes.
1. Classic Pinecone Rudolph Craft
The classic pinecone Rudolph is the perfect starting point for young crafters. The pinecone naturally resembles a little reindeer body, so you only need a few additions to bring the character to life.
Materials you’ll need
- One clean, dry pinecone
- Two googly eyes
- One red pom-pom
- Brown pipe cleaners
- Small felt pieces or craft sticks for optional ears
- Craft glue
- A small piece of cardboard for a base, if desired
How to make it
- Choose the pinecone. Pick one that sits relatively flat and has a sturdy shape.
- Add the eyes. Glue two googly eyes near the wider end of the pinecone.
- Make Rudolph’s nose. Attach a red pom-pom near the front.
- Create the antlers. Twist short pieces of brown pipe cleaner into branching shapes and secure them near the top.
- Add the finishing touches. Attach small felt ears or a cardboard base to help the reindeer stand upright.
Let the glue dry fully before moving the reindeer. If the pinecone is unstable, an adult can secure it to a cardboard base.
2. Pinecone Reindeer With Felt Ears
Felt ears add softness and color to a pinecone reindeer. This variation is especially charming for children who enjoy choosing shapes and decorating their creations with different materials.
Brown felt creates a natural woodland look, while cream or tan felt can make the ears stand out against a darker pinecone.
How to make it
Cut two small ear shapes from felt. They can be simple ovals or leaf-like shapes with pointed tips.
Glue the ears onto either side of the pinecone’s front. Add the eyes, nose, and antlers as you would for the classic design.
For extra detail, layer a smaller piece of pink or cream felt over each ear. Children can also add a tiny felt bow or scarf.
Budget-friendly tip: Use leftover felt from previous craft projects. Scraps are usually large enough for several pairs of reindeer ears.
3. Pinecone Reindeer With Googly Eyes and Pipe-Cleaner Antlers
Pipe-cleaner antlers are easy to shape and give each reindeer a playful personality. Children can make short antlers, tall branching antlers, or slightly curved designs to create their own variations.
The googly eyes add a fun expression, while the red pom-pom nose gives the craft its classic Rudolph appearance.
How to make it
- Cut two short pieces of brown pipe cleaner.
- Bend each piece into a branching antler shape.
- Twist a smaller piece around each main branch if you want additional points.
- Attach the antlers near the top of the pinecone using craft glue or adult-assisted fastening.
- Add googly eyes and a red pom-pom nose.
Try making a whole family of reindeer with different antler shapes and expressions.
Safety tip: Pipe-cleaner ends can be sharp. An adult should trim and bend the wire ends inward before children handle them.
4. Mini Pinecone Reindeer Ornaments
Turn your pinecone reindeer into Christmas tree ornaments by adding a hanging loop. These miniature decorations look charming on a tree, attached to a garland, or tied to wrapped gifts.
Choose smaller pinecones for a delicate appearance and keep the decorations lightweight.
How to make it
Create a small reindeer using the basic instructions. Attach a loop of ribbon or sturdy string to a secure point near the top, making sure the loop is firmly fastened.
You can use red, green, cream, or natural brown ribbon depending on your Christmas color scheme.
For a coordinated set, make several reindeer with matching ribbon but different facial expressions.
Important: An adult should attach and test the hanging loop before placing the ornament on a tree. Keep small craft parts away from young children who may put them in their mouths.
5. Pinecone Reindeer With a Red Felt Scarf
A tiny scarf gives a pinecone reindeer extra personality and makes the craft feel cozy and festive. Red felt works beautifully with a classic Rudolph design, while green, cream, or plaid fabric can create a different holiday look.
This is also a useful way to introduce children to simple fabric cutting and decorating.
How to make it
Cut a narrow strip of felt long enough to wrap around the front of the pinecone. Tie it loosely or glue the ends together at the side.
Add a tiny fringe to each end by making a few small cuts, with adult supervision.
Keep the scarf away from the eyes and nose so the reindeer’s face remains visible. If the pinecone is particularly small, use a short felt strip rather than a bulky scarf.
Styling tip: Place the finished reindeer beside miniature wrapped gifts or a small evergreen branch for an adorable holiday display.
6. Pinecone Reindeer Family Craft
Making a reindeer family is a lovely group activity for siblings, classrooms, or holiday craft parties. Different-sized pinecones can represent a parent reindeer and smaller reindeer, although children can invent their own characters and names.
The fun comes from making each reindeer unique.
How to make it
Collect pinecones in a range of sizes and prepare enough eyes, noses, antlers, and felt accessories for everyone.
Give each child the freedom to choose a different scarf color, antler shape, or facial expression. Once the glue has dried, arrange the reindeer together on a cardboard base with artificial snow, small evergreen branches, or paper gift boxes.
For a classroom project, children can write names on small paper tags and place them beside their creations.
Budget-friendly tip: Gather pinecones outdoors where permitted, and use leftover craft supplies rather than purchasing a separate kit for each child.
7. Pinecone Reindeer With Natural Wooden Details
For a more natural look, replace some brightly colored craft supplies with small twigs, wooden beads, and neutral felt. This creates a woodland-inspired reindeer that fits beautifully with farmhouse and Scandinavian Christmas decorations.
A wooden bead can serve as a nose, or you can keep the traditional red pom-pom for a small pop of color.
How to make it
Choose thin, clean twigs for the antlers and small pieces of felt for the ears. An adult should trim the twigs and attach them securely.
Add wooden beads or a pom-pom for the nose, then finish the face with small craft eyes or carefully drawn features.
Place the reindeer on a wood slice or a small cardboard base covered with natural-colored paper.
Styling tip: Display several natural pinecone reindeer with evergreen branches, wooden stars, and neutral ornaments for a cohesive winter woodland scene.
8. Glittery Pinecone Reindeer for a Sparkling Christmas Display
A little sparkle can make a pinecone reindeer feel extra festive. Gold or silver accents catch the light and complement traditional Christmas decorations.
For a child-friendly version, use glitter-free metallic paper or craft foam instead of loose glitter, which can spread easily and create a mess.
How to make it
Build the basic pinecone reindeer first. Add small metallic accents to the antlers, or attach a tiny gold paper bow near the neck.
If using glitter, an adult should apply a suitable craft adhesive and supervise the process. Keep glitter away from eyes and mouths, and allow the decoration to dry completely.
Avoid covering the entire pinecone in glitter if you want the natural texture to remain visible.
Styling tip: Pair the finished reindeer with neutral ornaments and warm-white lights for a balanced Christmas display.
9. Pinecone Reindeer Christmas Table Decoration
A handmade pinecone reindeer can become a sweet addition to a holiday table, children’s place setting, or seasonal display. Pairing the craft with evergreen sprigs and small wooden decorations helps it feel part of a coordinated Christmas arrangement.
Keep the setup simple so the reindeer remains the main attraction.
How to style the display
Place the reindeer on a small wood slice or a sturdy cardboard base. Add a few artificial evergreen sprigs, paper stars, or miniature wrapped boxes around it.
For a children’s table, use washable table coverings and avoid placing small decorative pieces near food. Keep the craft away from candles and hot serving dishes.
You can also make one reindeer for each child and use them as personalized place-setting decorations.
Budget-friendly tip: Reuse paper scraps to make miniature gift boxes, stars, or name tags.
Materials Needed for a Pinecone Reindeer Craft

Most supplies for this project are inexpensive and easy to find at craft stores or around the home.
| Material | Purpose | Alternative |
|---|---|---|
| Pinecones | Form the reindeer’s body | Cardboard cone or rolled brown paper |
| Googly eyes | Create the face | Drawn eyes on paper or felt |
| Red pom-poms | Make Rudolph’s nose | Red felt circle |
| Brown pipe cleaners | Form the antlers | Adult-prepared small twigs |
| Brown or tan felt | Make ears and scarves | Scrap fabric |
| Craft glue | Attach decorations | Child-safe adhesive suitable for the materials |
| Cardboard or wood slices | Create a stable base | Sturdy recycled packaging |
| Ribbon or string | Make hanging ornaments | Cotton cord |
Tips for Crafting With Kids
Pinecone crafts are a fun way to encourage creativity, but a little preparation makes the activity easier and safer.
- Prepare the pinecones: Use clean, dry pinecones without visible mold or insects.
- Set up a craft station: Cover the table with paper or a washable mat.
- Offer choices: Let children choose their reindeer’s nose, scarf, and antler shape.
- Use suitable glue: Choose an adhesive appropriate for the child’s age and the materials.
- Supervise small parts: Googly eyes, pom-poms, beads, and other small items can be choking hazards for young children.
- Handle sharp tools yourself: Adults should manage scissors for thick materials, wire ends, and any hot-glue gun.
- Allow drying time: Let the reindeer dry fully before moving or displaying it.
For toddlers and preschoolers, prepare the antlers and other small components ahead of time so they can focus on the larger, easier decorating steps.
Common Mistakes to Avoid
1. Choosing a pinecone that will not stand
A narrow or uneven pinecone may tip over when decorations are attached.
Better approach: Choose a broad pinecone or secure it to a sturdy base before adding the face and antlers.
2. Using too much glue
Excess glue can leave visible marks and make small details look messy.
Better approach: Apply small amounts of suitable craft glue and allow each piece to set before adding the next.
3. Making the antlers too heavy
Large or thick antlers can cause the pinecone to become unbalanced.
Better approach: Use lightweight pipe cleaners or small twigs and keep the antlers proportionate to the body.
4. Placing the eyes too far apart
Eyes positioned on opposite sides may make the reindeer face difficult to recognize from the front.
Better approach: Position both eyes close together near the front of the pinecone and check the expression before gluing.
5. Forgetting about age-appropriate materials
Small parts and wire can be unsuitable for very young children.
Better approach: Choose larger, child-safe materials and have an adult prepare sharp or difficult components in advance.
Frequently Asked Questions
1. What age is this pinecone reindeer craft suitable for?
With adult assistance, preschoolers can participate by choosing colors and attaching larger decorations. School-age children can usually manage more of the assembly independently, depending on their skills. Small parts should be kept away from children who may put them in their mouths.
2. How do you attach antlers to a pinecone?
Lightweight pipe cleaners can be secured with suitable craft glue or carefully fastened by an adult. Small twigs can also work, but they may require more support. Allow the adhesive to dry fully before handling the finished reindeer.
3. Can I use pinecones collected outdoors?
Yes, provided they are clean, dry, and free from visible mold or insects. Inspect them carefully before using them indoors, and discard any that appear damp or damaged.
4. How can I make the reindeer stand upright?
Choose a broad pinecone or attach it to a cardboard base or small wood slice. An adult can secure the base so the finished decoration remains stable.
5. Can I make a pinecone reindeer without googly eyes?
Absolutely. Use small paper circles, felt pieces, or carefully drawn eyes instead. This is an easy way to customize the craft with supplies you already have.
6. How do I turn a pinecone reindeer into a Christmas ornament?
Attach a securely fastened ribbon or string loop to the finished reindeer. An adult should test the loop before hanging it, and the ornament should be kept out of reach of young children if it contains small parts.
7. How can I make this craft more affordable?
Collect suitable pinecones where permitted, use leftover felt and pipe cleaners, and substitute recycled cardboard for decorative bases. You can also make several reindeer from one shared set of supplies.
Final Thoughts
An easy pinecone reindeer craft for kids is a simple way to turn natural materials into something festive and personal. With a few pinecones, googly eyes, red noses, and handmade antlers, children can create decorations that bring a little woodland charm to the holiday season.
Keep the materials simple, encourage children to invent their own reindeer designs, and enjoy the creative process together. Save your favorite idea and make a small reindeer family for your Christmas display this year.